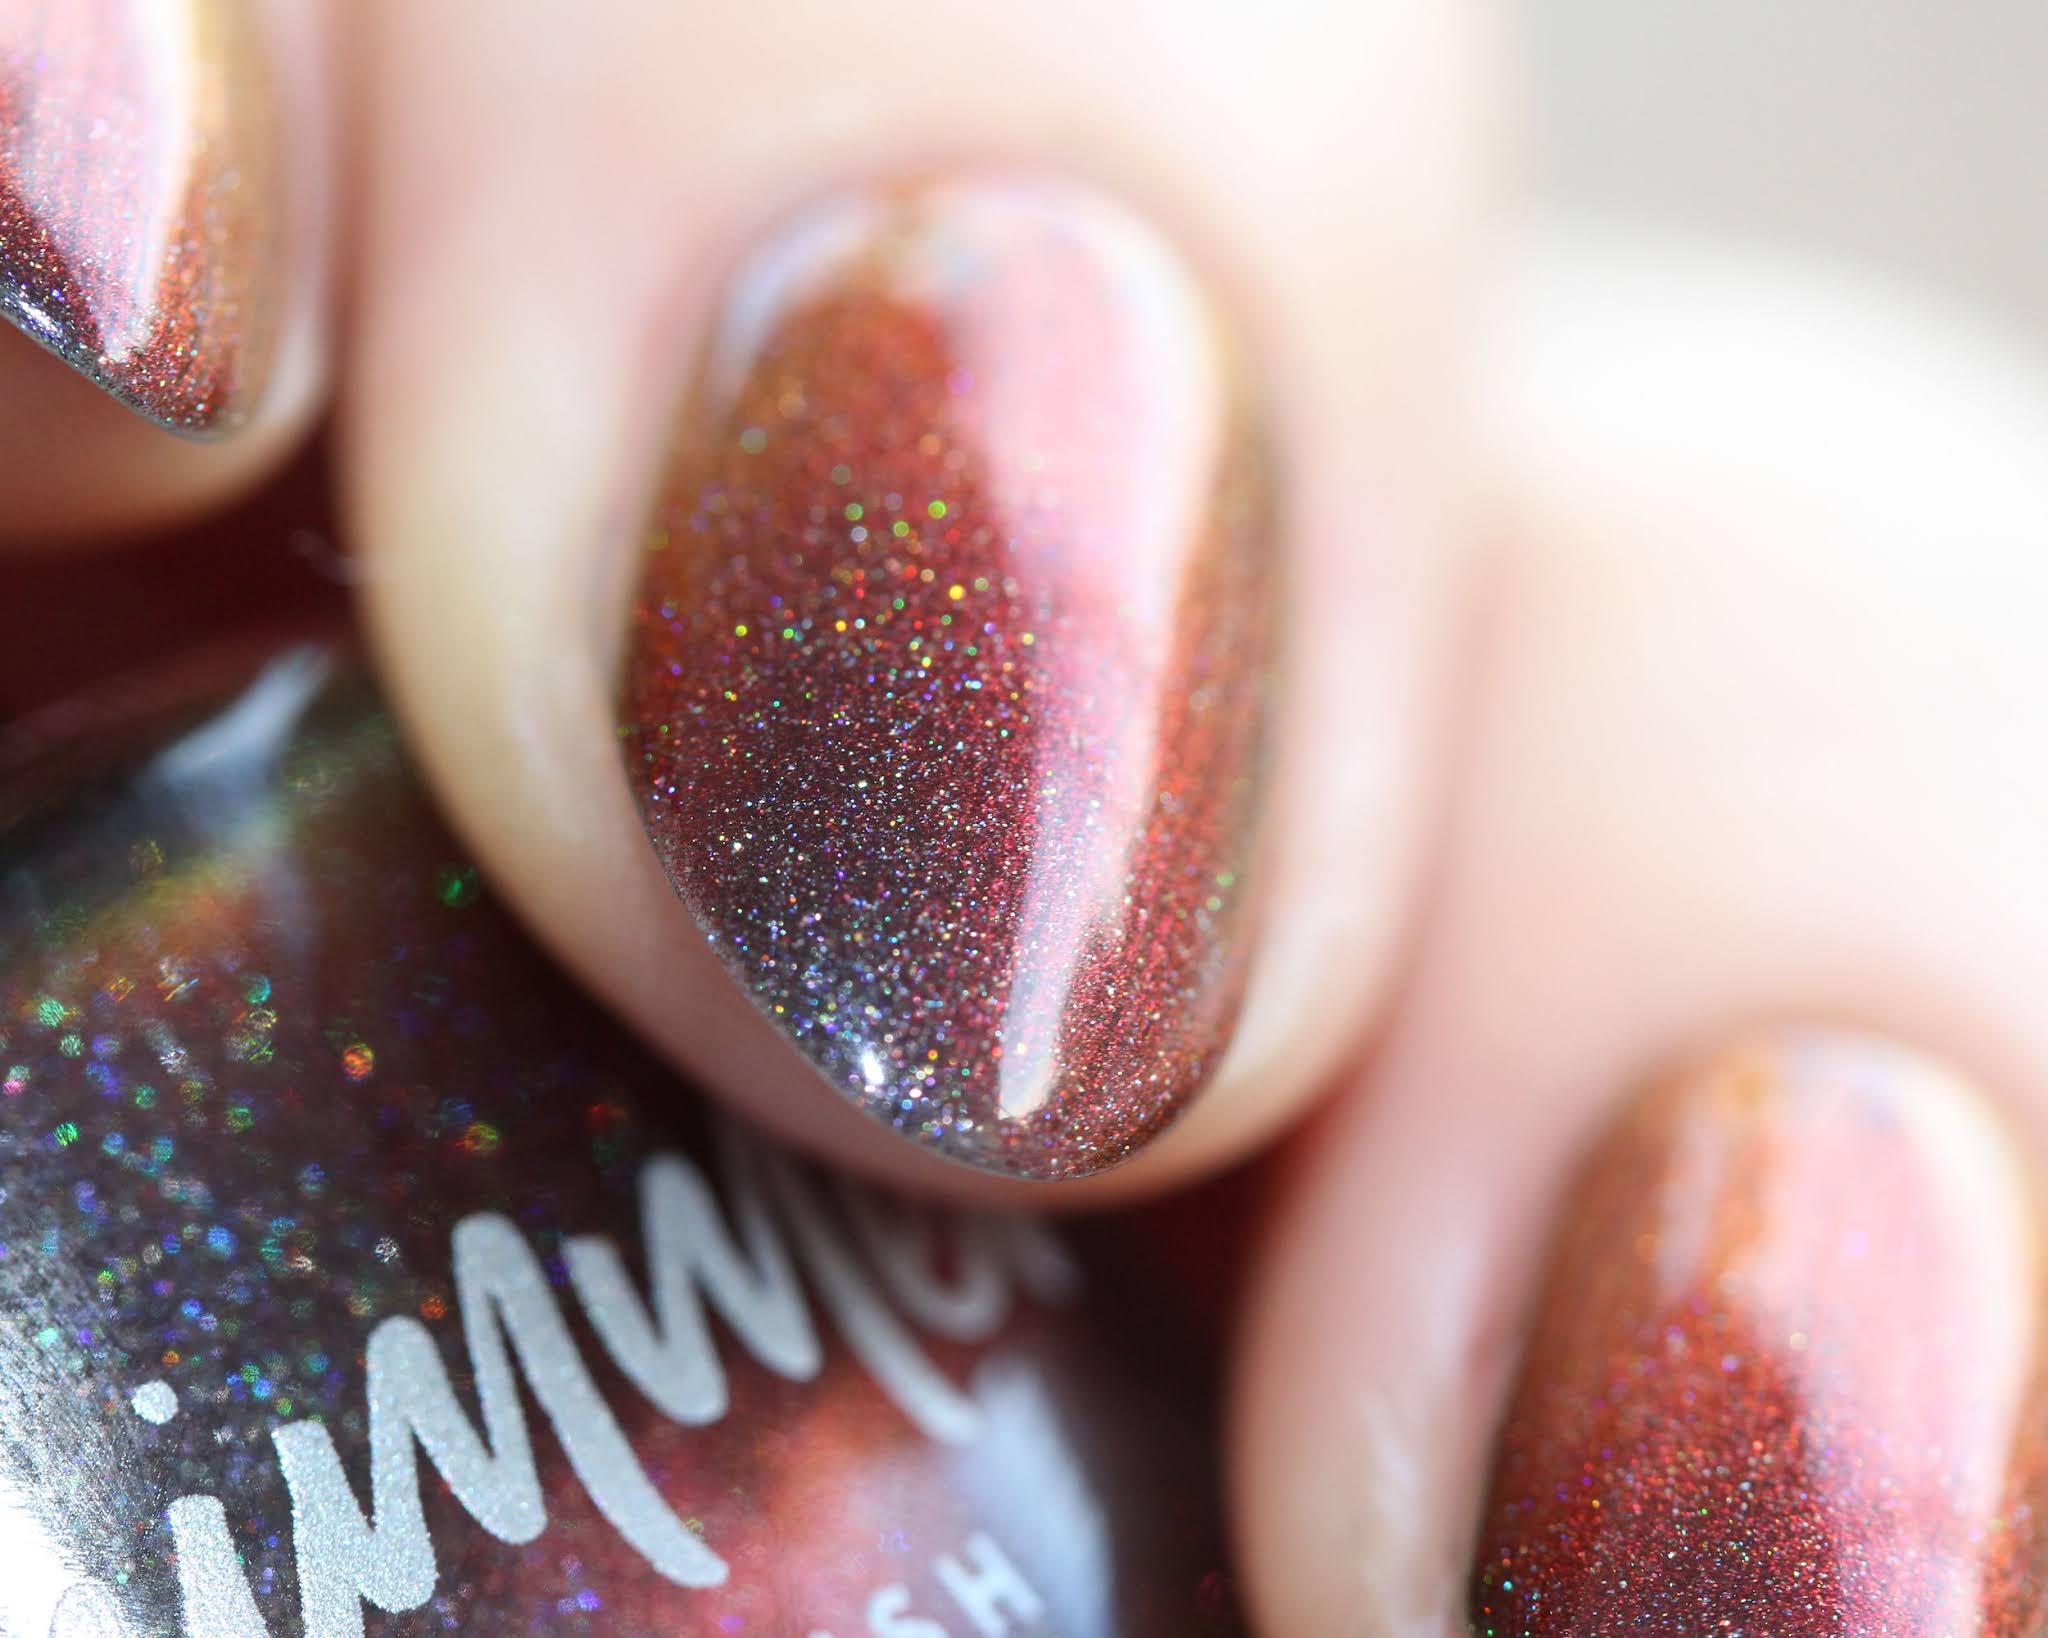
The temps are dropping, spirits are bright, cookies are baking, and folks are getting into the holiday spirit. While this year isn’t the ideal holiday experience with so many of us away from our families, lots of people out of work (my boyfriend included after 22 years at the same company), and stresses higher than usual, I feel like this is the year to really show our resilience and make these holidays great, no matter what the situation is. Tomorrow will always be brighter day, and until then, there’s always nail polish. <3 Speaking of–today I have the KBShimmer Love at Frost Sight collection to share with you!
Pale peachy golden champagne with shifts of pink, gold, and copper
Can we talk about how freaking gorgeous this is? It’s my favorite shade of the entire collection, and it’s not hard to see why! With its glory warm sheen, it’s sure to light your menorah!
Opacity scale (1-5): 2
Finish: Shimmer, 2-3 coats to be opaque
Icy silver metallic magnetic
This shade pulls double duty- you can wear it layered over your favorite darker polish and create cool designs with your magnet, or, like me, do 2-3 coats over your natural nail to create an icy, frosted look to your nail! Fun tip- try starburst shaped magnets for a unique shining star effect!
Opacity scale (1-5): 1.5
Finish: Magnetic, 3 coats to be opaque without magnet
Deep denim blue creme
The only creme in the collection, this one reminds me of dark, starry nights with that crisp chill in the air! It’s definitely a perfect base color for shades like Love at Frost Sight and Sol Amazing!
Opacity scale (1-5): 3
Finish: Creme, 2 coats to be opaque
Perfect wine linear holo
Ummmm, pour me a glass of my favorite Cabernet, I’ll be right back. Time to put on my comfy pants, because I’m nestling myself under the heated blanket next to two snugging pups, and streaming Hallmark movies all night. Don’t judge, we all have our vices. (I’m about 30 movies into the season lol) This is probably the truest wine colored holo I’ve seen, and I love it!
Opacity scale (1-5): 3.5
Finish: Holographic, 1-2 coats to be opaque
Black cherry base with color shifting flakes – thermal, warm state is a bright raspberry
This one totally reminds me of blackberry jam, which I LOVE to spread on sourdough bread (like everyone has been making during the last 8 months or so lol) it’s color-shifting flakes shift from pink, to copper to blue. This beauty is a thermal, which, I’ll admit I didn’t realize until I started to write this. In between tonight and the day I swatched these polishes, I’ve broken two nails (OF COURSE!), so I had to show off the temperature shift for you on a single nail. I hope you’ll all forgive me.
Opacity scale (1-5): 3
Finish: Thermal/Flakie, 2 coats to be opaque
Warm Santa red with color shifting flakes and scattered micro holo
A cheerful red with plenty of color-shifting flakes ranging from gold to red to orange. Look closely and you’ll see a sprinkling of good cheer in the form of micro holo flakes! As someone who is knitting and crocheting like a crazy person these days, I can totally relate to the spirit of this shade!
Opacity scale (1-5): 2.5
Finish: Flakie, 2 coats to be opaque
Clear base with color-shifting flakes of rust, gold & green (I even spotted a few sparks of blue!)
Sunshine in a bottle! This polish is so densely packed with flakes, you’re not going to have to do too much work to get a lovely shifting sheen on your nails! Layer it over shades like Stream On, Stream Away or wear it alone, either way, it’s sure to be a ray of sunshine!
Opacity scale (1-5): 2
Finish: Flakie, 2+ coats to be opaque
Champagne & pink holo glitter bomb
Tis the season to glitter allll the things! It’s the season of sparkle, and this one won’t let you down. It’s the bubbles in your Champagne glasses, the sparkle on your tree, the shimmering flame of your menorah. It’s one that will look good year round, but is really a gift this time of year!
Opacity scale (1-5): 2
Finish: Glitter, 2+ coats to be opaque
Emerald green with color-shifting flakes and subtle micro holo
With it’s deep evergreen hue and mixture of flakes and holo, it’s like a brightly decorated Christmas tree with all your favorite ornaments and twinkling lights on every bough.
Opacity scale (1-5): 2.5
Finish: Flakie, 2 coats to be opaque
White crelly with red and green glitter
The instant I saw this polish, my mouth started watering, and I glanced to my baking cupboard with desire. I can almost taste the creamy frosting and feel the crunchy nonpareils (the superior sprinkle of ALLLLL the sprinkles…fight me) between my teeth. This one totally hits the mark for me–it totally evokes memories of holidays spent in the kitchen baking treats for family and friends.
Opacity scale (1-5): 2.5
Finish: Crelly/Glitter, 2 coats to be opaque
Blackened Burgundy with shifts to gold, green, and rust.
Holy wowza! Such a super gorgeous (and stealthy) polish that needs to be in your collection! I love the way that when the light hits is perfectly your nails are set ablaze in color!
Opacity scale (1-5): 3
Finish: Multichrome, 2 coats to be opaque
Silvery aqua with shifts to cerulean and purple
Imagine this–you’re on a simmering sea, and the sun has just dropped below the horizon, and the purple sky is starting to show its beauty. That is THIS polish! It’s a far more shy/subtle shift than ones like Obsidian, but it’s oh so gorgeous!
Opacity scale (1-5): 3
Finish: Multichrome, 2 coats to be opaque
Obsidian + holo shimmer!
Everything to love from Obsidian, but with the addition of HOLO. Ummmmm HELLO! Super gorgeous- it’s like Obsidian is on fire with embers of holo.
Opacity scale (1-5): 3
Finish: Multichrome, 2 coats to be opaque
Bright royal blue shifting to turquoise, purple, and even a hint of pink
Umm, if I had a dragon, it would be this color. I think it’s pretty obvious why, with that absolutely stunning shift. If that dragon had a brother though, it’d be Obsidian, because duh. Just call me Khaleesiiiiiii.
Phew! I hope you’ve made it this far with me, but if you were distracted by one of these gorgeous polishes, I can’t say that I blame you! There are so many beautiful polishes in this collection, but there are some definite standouts. For me, those standout polishes are Shamash Hit, Sip Back and Relax, Baking Spirits Bright, and Obsidian! Tell me in the comments what your favorite shades from this collection are!
The festive season is here, a time of celebrations, glamorous looks, and unforgettable moments. Just as your wardrobe gets its seasonal upgrade, your hair deserves the same level of care and attention.
Colder months can leave hair feeling brittle, dull, or lacklustre. But with the right ritual, your locks can remain sumptuous, voluminous, and luminous all season long. Here’s how to prep your hair for the holidays with Iles Formula, the benchmark in luxury reparative haircare.
Regular deep conditioning treatments are crucial during the colder months. They help replenish lost moisture and strengthen strands, keeping dry hair soft and resilient.
Haute Performance Hair Mask
This luxury hair mask restores moisture, improves hair elasticity, and leaves hair soft and supple
Opt for products that are gentle and nourishing, especially for coloured hair.
Recommended Products:
Iles Formula Shampoo Haute Performance: A sulfate-free + Silicon Free shampoo that cleanses without stripping natural oils.
Iles Formula Conditioner Haute Performance is a jewel and stands apart in the hairdressing industry with its with unique performance of cuticle closure without depositing weight of any kind. The shampoo and conditioner have been formatted as part of a 3 step system that delivers the majestic hair of your life !
During the colder months, you might be tempted to use heat styling tools more frequently. Always apply a heat protectant to shield your hair from potential damage.
Recommended Product:
finishing serum haute performance
This Iles Formula finishing serum not only protects against heat damage but also adds lustrous shine, frizz control, and sumptuous hair smoothness.
A healthy scalp is the foundation for strong, healthy hair growth. Regular treatments prevent dryness, flakiness, and support hair strength.
Recommended Product:
Scalp + Hair Rejuvenating Booster
This scalp and Hair rejuvenating booster nourishes and revitalizes, creating the perfect environment for vibrant healthy scalp and hair growth
By incorporating all of the above into your routine, and pairing them with The Iles Formula Holiday Collection, you’ll achieve the ultimate preparation for the festive season.
This curated collection unites the Signature Shampoo, Conditioner, Finishing Serum, Vegan Case, and Wet Brush. The complete ritual for hair that feels sumptuously soft, weightless, and impeccably smooth.
With the Holiday Collection, every wash, condition, and finish becomes a moment of indulgence, ensuring your hair looks as radiant and unforgettable as the season itself.
The barrel leg jean has been slowly creeping into our local boutiques and retailers (and our wardrobes) over the past 3 years now. But for many of you, they’ve been a more recent discovery and one that perhaps at first, you considered a steadfast ‘no’ when you saw the likes of me wearing them.
I know this to be true from the reactions and comments I received on my very first video featuring my barrel leg jeans back in 2022. Let’s just say, reactions were mixed! Comments like, “they make you look bow-legged” and “I think you need to get back on your horse Sally!” were common.
But fast-forward almost 3 years, and it seems that you’ve come around… finally. The barrel leg jean, I would argue, is not just ‘another trend’ that we’ll look back on and think, “what was I thinking?” it’s instead just another version of a wardrobe staple… the classic denim jean.
As you know I’m a huge lover and wearer of denim. I always have been. For me, the jeans in my closet are what keeps my style grounded, interesting and modern. I love the way a pair of jeans can instantly make me feel relaxed, sporty, edgy, unique, cool… whatever way I want to feel on any given day.
Jeans can be like that for you too. And having a variety of styles of jeans is what allows you to determine what image you want to portray from one day to the next. The barrel leg jean is just another tool in your denim toolbox.
While I might use a barrel leg jean to lean into the contemporary side of my personal style, you can use them to achieve something completely different, because your style will be different to mine. I’ve now styled hundreds of clients in these jeans, not with the intention to create clones of myself, nor to project my sense of style on to them, but to help them build wardrobes with more tools at their disposal.
My clients have ranged from Millennials wanting to get out of their skinnies, retirees wanting to modernise their look, creatives looking for a funky yet comfortable jean to sit at their desks in, and mum’s on the sidelines of weekend sport desperate to get out of their leggings.
I’ve worked with women of all shapes, sizes, heights, ages and budgets and put them in a barrel leg jean. Trust me when I say, everyone can wear them. The only clients I’ve met who’ve ‘declined’ the barrel leg jean, simply don’t like them. And that’s cool! I’m not here to tell you NEED a pair, especially if the look of them does not appeal to you. It’s of little service even if an item of clothing looks amazing on you, you just don’t feel good wearing it.
So below, due to popular demand after my most recent postare my favourite barrel leg jean styles that I’ve styled my clients in. I’ve included a range of price points, size ranges and barrel ‘extremes’. How these suggestions work for your wardrobe, and your personal style, is up to you. Don’t overthink barrel leg jeans, they’re just another jean in your wardrobe!
If you need a refresh on styling them, you can always check back to these posts:
All the below suggestions are shown in Australian sizing and in AUD. No commission is earnt from these links.
These are REALLY good! Witchery have managed to perfect the curve with an additional panel down the side of each leg. Very Tibi-esque (the Tibi version, is included below)
For those who need a little bit of reinforcement around the waist, the waistband and double button feature of these is really great for creating additional shape and support.
Agolde Luna Jeans, sizes 6-16 – $479 (other washes available)
These are one of the pairs I own, and they’re great. I was unsure about the raw hem (I’m pretty sure there are hemmed options) but it does add a little bit of additional edge. Come to think of it, this is probably the style Witchery modelled their’s off.
Cos Arch Taper in washed black, size 6-14 – $159 (other washes available)
For those wanting a less extreme shape, these are goodies. Trouble is Cos don’t seem to bring in many of any size, so they sell out quickly.
Rolla’s Gigi in raw denim, sizes 6-16 – $159.95 (other washes available)
If you like your barrels with a little bit of retro edge (i.e. those rear pockets) then these Rolla’s are a great option, and reasonably priced too. The raw denim (as I’ve featured in a few picks) is perfect if you want your denim to feel more elevated.
These include the hallmarks of a good barrel, with the diagonal stitching at the knee, giving the jeans a little extra personality. And psst… these have an elasticised rear waistband!
Alpha 60 Dalton Jeans, sizes XXS-XL – $229
My OG barrels are these from Alpha 60 (I have the indigo and washed black) The contrast stitching on these below is cool, but can look a bit ‘wrong’ if you’re petite, as it falls a bit too low on the leg.
I have the bleached denim version of these and I’m literally tempted every other day to buy another pair! So I keep an eye on them secondhand. These will NEVER go on sale at Tibi FYI! They come in 2 lengths too! Great for tallies like me.
A great affordable option in a good size range. Decjuba always do great denim (that is also usually soft and comfortable)
Ksubi Spliced Barrel, sizes 4-14 – $299.95 (larger size range in other washes)
So, I haven’t seen these on but… I think I need to try them! For those of you who like your clothing a little more experimental, I reckon these are super cool.
Say no more, Frame knows how to make denim. Yes they’re an investment, but at the end of the day if the barrel leg style and silhouette really works for you, and you can see yourself wearing them for years to come (like me) and you have the budget, then that’s a choice only you can make.
Let’s introduce you to my friend, Casper, Founder of Wrap Happy Co, a joyful Australian brand reimagining how we wrap our gifts, blending playfulness with planet-friendly values. The magic started when the founder (yep, that’s our friend behind the happy hustle) realised that the usual waste generated from single-use gift wrap just didn’t sit right.
From that heart-tugging moment, Wrap Happy Co was born — a place where your wrapping choices make you feel genuinely good, every single time.
Explore her celebration collection here
What makes Wrap Happy Co so special? It’s the story: after searching for wrapping solutions that weren’t landfill-bound, our founder discovered a way to turn every present into a celebration of self-worth and tiny moments of joy.
The Wrap Happy Co collection is here to help you create fun, beautiful gift rituals. No eco-guilt, no complicated folding — just effortless, reusable wraps that brighten your celebrations and your conscience.
Curious? Peek at the playful options and imagine your next birthday, holiday, or just-because occasion with wraps that last and memories that matter.
Personal favourite? The Tis the Season Xmas Prints kithands down. It was dreamed up for those last minute “I need to wrap quickly” thoughts before Xmas. But with Wrap Happy Co, wrapping is now the easiest part — oodles of color, a touch of sparkle, and you get time back for what matters (like, enjoying the celebration!).
If you’ve ever wanted your gift wrap to feel like a treat — to your recipient, to yourself, and to the world — this is it.
And even better? Right now you can save 15% across sitewide with code WRAPHAPPY15. Try it out and discover how simple, joyful wrapping can make your celebrations shine.
Spring break is just around the corner, and many of us are gearing up for exciting travel plans. While packing your sunscreen might already be on your checklist for lounging poolside or hitting the beach, did you know it’s just as important to protect your skin during your flight? At Advanced Dermatology, we want to remind our patients that UVA exposure at high altitudes is a real risk, even while sitting in an airplane cabin.
Airplane windows may block UVB rays, which cause sunburn, but they offer little to no protection against UVA rays. UVA rays penetrate more deeply into the skin, contributing to premature aging and increasing your risk of skin cancer. At cruising altitude—where planes fly around 30,000 feet above the ground—the thinner atmosphere provides less protection from the sun, and the intensity of UVA exposure is significantly higher. Pilots and frequent flyers, for example, have been found to have an increased risk of melanoma due to this heightened exposure.
If you’re seated by a window during your flight, you’re directly in the path of these harmful rays. Even brief periods of exposure during a single flight can accumulate over time, putting your skin at risk. That’s why applying sunscreen before boarding is just as crucial as when you’re spending a day outdoors.
For optimal protection, we recommend using a broad-spectrum sunscreen with an SPF of 30 or higher. Look for products containing ingredients like zinc oxide or titanium dioxide, which provide a physical barrier against UVA and UVB rays. EltaMD® UV Clear ($43, 1.7 oz), skinfo® Pure Protection Ultra ($43, 4 oz), and Alastin® Hydratint ($24, 0.4 oz; $76, 3.2 oz) are a few of my favorites from skinfo®. Don’t forget to reapply if your flight is particularly long or if you plan to do some sightseeing immediately after landing.
At skinfo®, we’re passionate about raising awareness of everyday sun protection, whether you’re on the ground or in the air. If you’re planning your spring break getaway, prioritize your skin’s health by incorporating sunscreen into your travel routine. And if you have questions about the best products or how to protect yourself, we’re here to help!
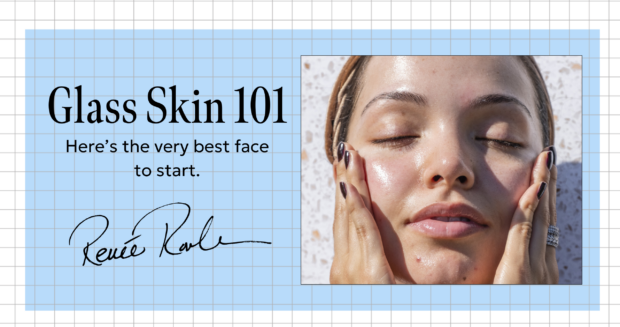
When it comes to the “glass skin” trend, online experts are pushing intensive hydration to give a plump, dewy look but I’m here to tell, you can’t hydrate your way to achieving glass skin. As a 35 year expert esthetician, I’ll share with you how to truly get skin that is smooth-as-glass that you will absolutely love.
What Exactly is “Glass Skin”?
Glass skin is a term that refers to skin that is incredibly smooth, clear, and radiant and reflects light – almost resembling a piece of glass. It is defined as skin that is deeply hydrated, plump, and glowing with a pore-less and flawless finish. Sounds incredible, right? Let’s touch on all things glass skin.
The 4 Essentials for Achieving Glass Skin
Smooth-as-glass texture (free of bumps and blemishes with minimized pores)
Even-toned with minimal discoloration
Glowing / Circulation (a naturally healthy glow from within)
Moisture / Hydration (dewy, plump skin)
Let’s Touch on Texture
Clogged Pores
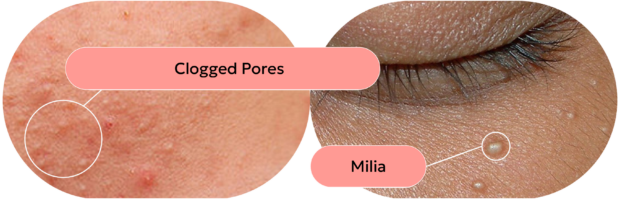
Clogged pores (known as “closed comedones”) appear as white-ish bumps on the skin. When you think of glass skin, the first thing that comes to mind is a smooth texture not bumpy. Clogged pores are not as round or firm as milia (mentioned below), but when left untreated, they tend to hang around for long periods of time.
Causes of clogged pores: Oily skin, wrong products for your skin type, pore-clogging makeup (I’m looking at you, cream blushes and highlighters!), heavy sunscreens
Renée’s expert advice: Receive manual extractions from an esthetician. This blockage in your pores WON’T go away on their own. Once you get them cleared out, the goal is to keep them clear with the following leave-on acid exfoliators.
Product recommendations:
BHA Clarifying Serum
Pore + Wrinkle Perfecting Serum
Thousands
Milia are hard, tiny bumps on the skin that appear when keratin and hardened oil get trapped below the skin’s surface. Milia are round and, because of how they look, are sometimes described as tiny “pearls.” The hardened oil gives them an off-white color, and they appear most commonly around the eyes, nose, and cheeks.
Causes of milia: Hyperkeratosis, heavy eye creams, smoking
Renée’s expert advice: Receive manual extractions from an esthetician. Just like closed comedones, these don’t magically disappear. Find an esthetician who is skill in extractions for removal. Dermatologists can remove milia, too.
Product recommendations: Overnight Eye Serum
Let’s Touch on Blemishes and Enlarged Pores
Blemishes
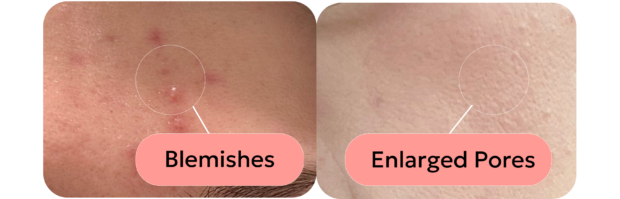
Blemishes can be in the form of whiteheads, pustules, or cysts. Acne can be very complicated but there are ways to prevent blemishes from forming and knowing what to do once they appear so you can achieve glass skin.
Causes of blemishes: Hormones, incorrect products, dairy, many unknowns, a case of bad luck.
Renée’s expert advice: See an experienced skincare professional who can help guide you to an action plan to give you results.
Product recommendations:
Anti Bump Solution
Rapid Response Detox Masque
AHA/BHA Blemish Control Cleanser
Rapid Response Detox Cleanser
Enlarged Pores
Enlarged pores are pores that have been physically stretched out by excess oil production or the loss of collagen. You most certainly can shrink these back to their original size. Otherwise, if your pores aren’t enlarged, their size is genetically determined, which means it’s impossible to make them any smaller than they’re meant to be. In this case, you can only minimize their appearance—not their actual size.
Causes of enlarged pores: Excess oil production, hormones, age
Renée’s expert advice: Regular use of physical and chemical exfoliants and retinol/retinoids
Product recommendations:
Pore + Wrinkle Perfecting Serum
Pro Results Power Serum
Triple Berry Smoothing Scrub
Advanced Resurfacing Serum
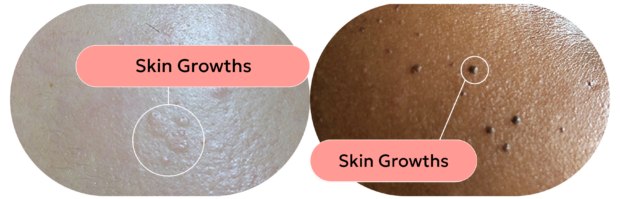
Let’s Touch on Skin Growths
Skin Growths
Skin growths are bumps on the face, neck, and body. They are usually benign (non-cancerous) and often begin as small flat or rough bumps.That said, it’s very important to keep an eye out for anything new or changing. Always schedule regular skin checks with your dermatologist. When in doubt, always get it checked out.
At first, these growths might be mistaken for clogged pores or breakouts, but they will never come to a head and cannot be extracted since there is no oil in them. Treating them with harsh, breakout-focused products will only result in dry, irritated skin.
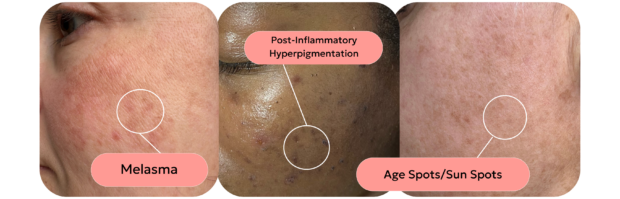
Discoloration is an overproduction of a pigment called melanin. Genetics, sun exposure, hormones and injury to the skin are the most common causes. Once the melanin factory turns on, it can be hard to calm fussy pigment cells back down. This is why it’s so frustrating because they can take months to go away – especially the deeper your skin tone is.
Causes of discoloration: Sun exposure, heat, blemishes, pregnancy, aging, genetics
Renée’s expert advice: Products that fade/brighten, physical and chemical exfoliation, use SPF (during all daylight hours every single day of the year!), add an extra layer of protection with foundation makeup
Product recommendations:
HyperFix Fading Toner
Vitamin C + E Treatment
Triple Berry Smoothing Peel
Triple Berry Smoothing Scrub
Weightless Protection SPF 30
Let’s Touch on Circulation
Under-Circulation
How to tell if the skin is under-circulated:
When your skin is makeup-free, take your thumb and forefinger and gently pull on the apples of your cheeks. Using light pressure, quickly pinch the skin five times.
If your skin becomes a little pink, it’s likely that it has proper circulation.
If your skin doesn’t become pink, it’s more than likely under-circulatedand you’ll want to boost circulation. If your skin becomes red, your skin is likely over-circulatedand you’ll want to keep it calm with soothing (not energizing) products.
Basically, to get the glowing skin you want, the goal is for your circulation to be right in the middle—not too much, not too little.
Causes of under-circulated skin: Slow blood circulation, genetics, smoking, drug use
Renée’s expert advice: Hang your head upside down, facial massage, exercise, use stimulating ingredients, restoring the skin barrier
Product recommendations:
Mint Renewal Cleanser
Energy Boosting Toner
Triple Berry Smoothing Peel
Let’s Touch on Moisture, Hydration and Light-Reflection
Moisture Loss
Causes of moisture loss in the skin: Dryness (lack of oil), dehydration (lack of water), build up of dead skin, weather, topical prescriptions
Renée’s expert advice: The “Golden Minute Rule”, gentle cleansers, water infusion sealed with barrier repairing masque, creme or lotion
Product recommendations:
Moisture Infusion Toner
Skin Recovery Balm
Skin Recovery Lotion
Skin Drink Concentrate
Hydraboost Rescue Creme
Rest Day Masque
Let’s Touch on Your Glass Skin Action Plan
Take the Skin Type Quiz
Use products for your skin type
Get glowing #thereneeway
While “glass skin” is a trendy word and may go away, the goal of getting the skin to look smooth-as-glass will always be a desired look. I hope you enjoyed this post!
Celebrity Esthetician & Skincare Expert As an esthetician trained in cosmetic chemistry, Renée Rouleau has spent 35 years researching skin, educating her audience, and building an award-winning line of products. Her hands-on experience as an esthetician and trusted skin care expert has created a real-world solution — products that are formulated for nine different types of skin so your face will get exactly what it needs to look and feel its best. Trusted by celebrities, editors, bloggers, and skincare obsessives around the globe, her vast real-world knowledge and constant research are why Marie Claire calls her “the most passionate skin practitioner we know.”
The cast of Dancing With the Stars may make the cha-cha, foxtrot, and samba look effortless on screen, but they put in work behind the scenes. Sure, hours of rehearsals are part of the equation, but according to the show’s long-time physical therapist Gina Minchella, DPT, the stars’ recovery routine is just as instrumental in helping them take the spotlight week after week.
After all, injuries on DWTS can hinder performance (like they did this season with season 34 celeb dancers Alix Earle and Danielle Fishel), so Dr. Minchella has a playbook for keeping the crew healthy. “My approach is very preventative. It’s really taking on a lot of techniques that help prevent injuries,” Dr. Minchella tells SELF.
Over the last 13 years with DWTS , she has built a team of physical therapists who support the cast (both pros and celebs) throughout the season and the Dancing With the Stars Tour. Together, they design individualized and highly specific recovery routines depending on each dancer’s body.
Here’s how she keeps the team going during grueling workouts—and advice to incorporate her tips into your routine.
1. Focus on active recovery.
The cast of DWTS asks a lot of a few muscle groups—namely, the hips, lower back, and hamstrings. So, when Dr. Minchella programs an active recovery or stretching routine for the dancers, she tailors her recommendations with a special focus on the piriformis.
“The piriformis is always a culprit for hip pain and low back pain,” she explains, referring to a small muscle located deep in the glutes. A too-tight piriformis stresses the sciatic nerve, which runs from the base of your spine all the way down your leg.
To keep the piriformis loose, Dr. Minchella recommends two hip stretches: pigeon pose or figure four pose. A low lunge to stretch out the hip flexors is also a great option for the dancers, she adds. “I will actually manually stretch them by letting [the dancer’s] leg kind of hang off the table,” she explains.
The takeaway for dancers and non-dancers alike? Identify the key muscles you use for your workouts, and make sure to give them plenty of love. If you’re a rock climber, you may want to focus on your upper back, hamstrings, and forearms, for example. And runners may want to give love to their hamstrings, quadriceps, and glutes.
2. Treat your warm-up like part of your recovery.
Dr. Minchella considers warm-up routines to be an essential part of recovery. “They’re preparing their muscles and joints for handling whatever they’re taking on. Then the recovery period is even easier, and even more beneficial.”
This post contains ad affiliate links (denoted by a ‘*’) & gifted items (denoted by ‘ad – gifted). You can read my full disclaimer here.
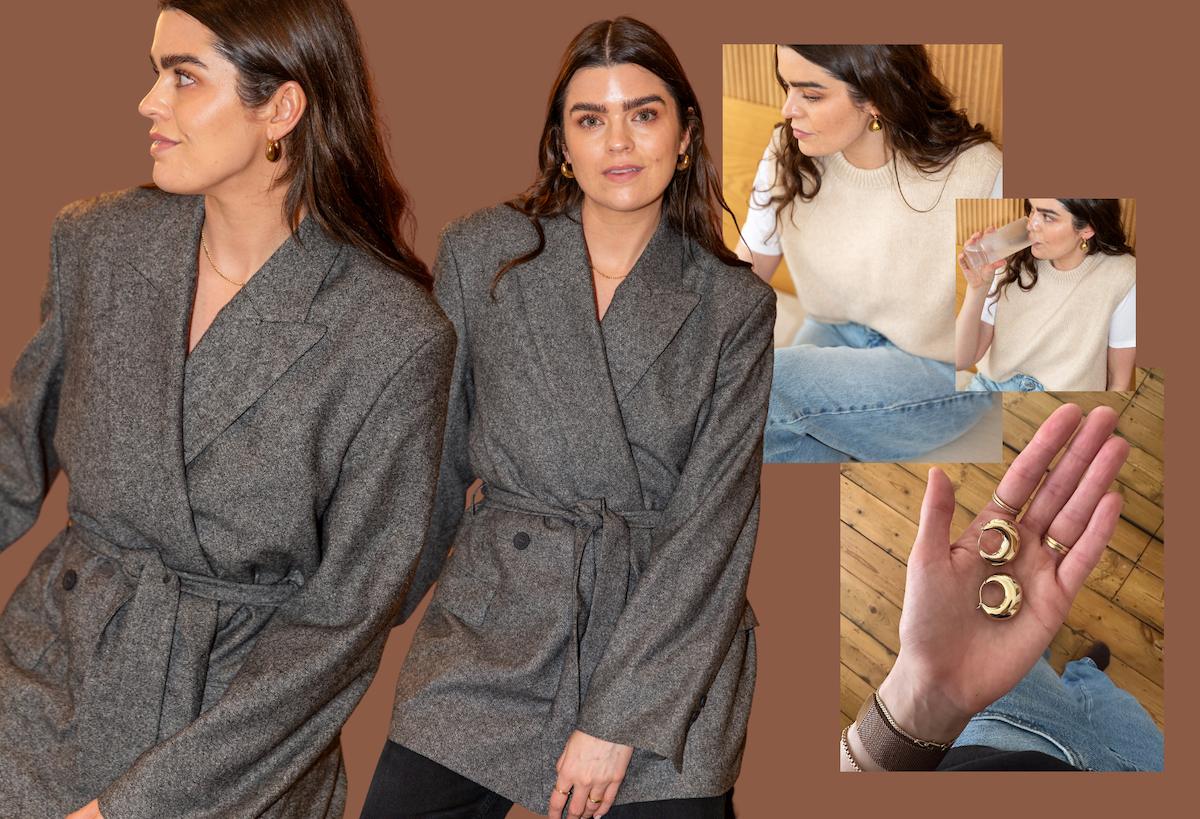
I’ve always loved jewellery, but in the past year or two I’ve really honed in on my style, my everyday favourites and the items that I never take off. They are outfit makers, polishers even and they have the ability to put balance back into a look that just feels a bit off. I’ve realised that for me I like to blend chunkier, sculptural pieces with everyday lighter pieces, along with things like my rings and bracelets that stay put no matter what. So here’s what my jewellery wardrobe looks like…
NECKLACES
I own a few more necklaces than I’ll mention here, but really at the moment I’m switching between just two. I’m either wearing the Mejuri Curb Chain Necklace* (ad – gifted) – which I’d say is probably my top jewellery pick of the bunch – or the Lie Studios Elly Necklace*. Both are complete opposite ends of the spectrum and add a slightly different flavour to whatever outfit I’m wearing. The Mejuri I leave on, until I swap it out for the Lie Studios as that’s more of a daytime-only costume piece. But really there isn’t much decision making that goes on here – it’s either one or the other.
EARRINGS
Ok here’s where I play a bit. I’ll start with the simple one first. My everyday earring is a style from Mejuri which are now discontinued but are most similar to their Easy Medium Hoops*. Just a simple hoop, nothing crazy but I can sleep and shower in them and only ever take them out to swap them for something bolder. I just bought the Mejuri Sculptural Hoops* and they are truly beautiful – these two together would be the perfect dainty/bold earring capsule. Most of the bolder earrings that I wear though are from Lie Studios and I mostly switch between their drop-earring style, the Julie* or their extra large Camille Studs* (ad – gifted). You would have seen me wear both of these styles multiple times as it’s what I use most mornings to add polish to my outfit.
BRACELETS
I don’t really mix up my bracelets, mainly because my Apple Watch takes up most of the real estate on my wrist. So I just wear my Mejuri Round Box Chain Bracelet* (ad – gifted), with their Timepiece Bracelet* (ad – gifted). The latter is a little chunkier and the former daintier and I never take them off, only ever swapping them out if I’m at an event and want to leave my wrists bare. One day I’d love to add the Lie Studios Elly Bracelet* to my collection – it’s on my shopping list!
RINGS
I almost forgot to add this section in! I NEVER take these off, so they don’t register in a way. They are just part of me – literally – some I can’t remove! My engagement ring and wedding ring were from a local shop in Brighton (I think we got engaged almost nine years ago now and I STILL love my ring, so simple – Mark did so well!). Then on my index finger on my left hand I wear a very, very old black gemstone ring that Mejuri don’t even make anymore (the Solo Diamond Ring* is similar), with their Diamonds Line Ring* (ad – gifted) stacked. On my right index finger I wear the Mejuri Twist Ring* (ad – gifted) that I’ve owned for YEARS, on my middle finger their 2mm Smooth Band* and on my ring finger on my right a Claire Kinder ring that I picked up when we went to visit Shop Anomie in San Francisco.
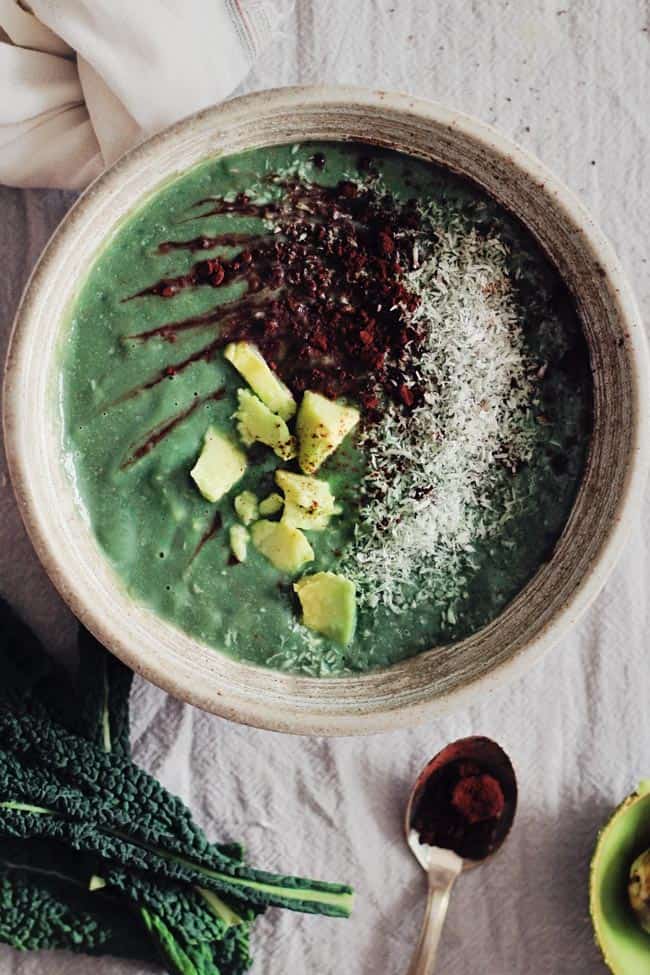
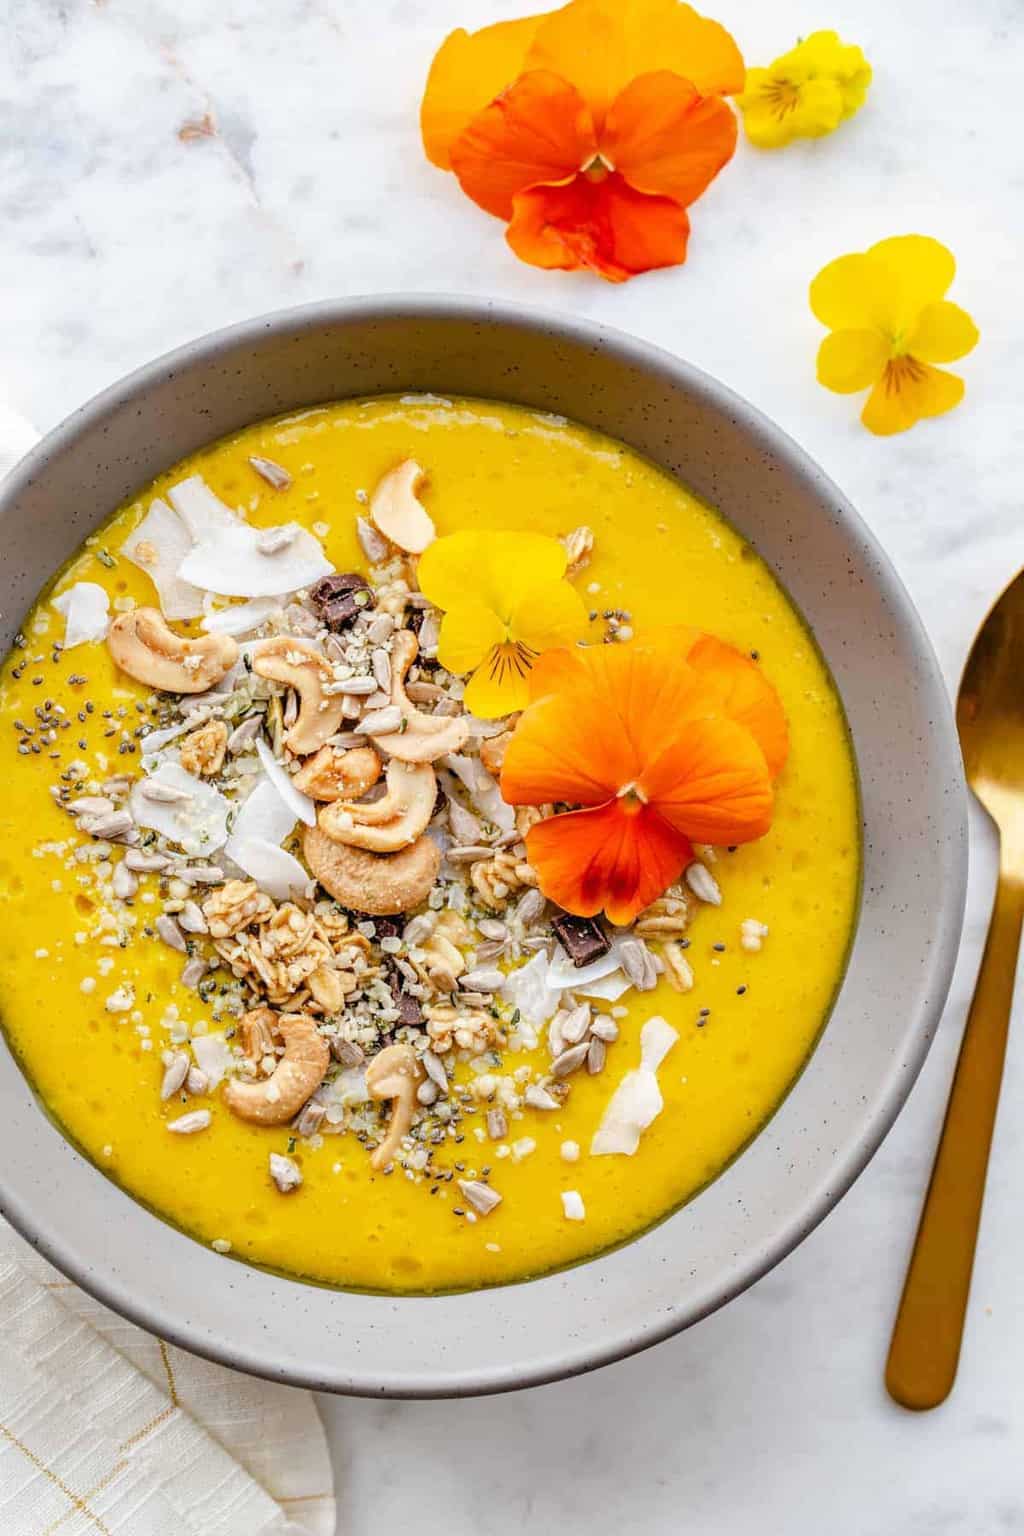
You’ve definitely heard of smoothies by now, but what about smoothie bowls? These filling and nutritious breakfasts are just like smoothies but are made a bit thicker so they can be spooned up and topped with extras.
They’re perfect for those who like to sit and eat their breakfast versus sipping it from a straw (don’t know about you, but I can chug a smoothie in about 5 seconds flat…), and these are a super-easy way to pack in tons of superfoods, protein, vitamins, and minerals.
Jump to:
Whereas the ingredients are all mixed in a smoothie,smoothie bowls are usually topped with something—like nuts,seeds,granola,fruit,or shredded coconut—to add nutrition,flavor,and textural variety.
Are Smoothie Bowls Healthy?
While having a smoothie is a simple snacking way to add more veggies and fruits to your diet,you can actually turn your smoothie bowl into a nourishing meal on its own. The trick is to create a combo that fuels your cells with all the nutrients they need to keep you going and satiated until the next meal.
As long as you go for whole ingredients and fresh fruits and veggies,staying away from refined sugar and saturated fats,your smoothie bowl is definitely a healthy meal.
Smoothie Bowl Ingredients
Smoothie bowls are a very simple and convenient way to nurture your body’s cells. A balanced diet needs a constant intake of:
fiber(oats,fruits,veggies,sprouts,and seeds—basically all of the ingredients coming from plants)) to eliminate waste and toxins and prevent them from leaking back into your system
fermented foodsto introduce healthy bacteria into your gut microbiome (yogurt)—note:the legumes and raw fruits and vegetables will maintain the growth of those healthy gut bugs
freshfruits and veggiesfor minerals,antioxidants,anti-inflammatories,vitamins—the list goes on and on
fresh greensare filled with chlorophyll,which boosts natural detoxification and bathes your cells in antioxidants
proteins(fresh fruits and veggies,oats,nut butter,cooked quinoa,beans,tofu) for an energy boost that will keep you active
healthy fats(nuts and nut butters,avocado,coconut,ground flax seeds,chia seeds) to nourish the tissues
A smoothie bowl is an ideal way to include all of these. Adding adaptogens and superfoods such as maca powder,bee pollen,ginger,turmeric,or spirulina is also a great way to boost the nutritional value of your bowl and add extra support to balance your metabolic processes.
Making one is almost as simple as making a smoothie. In fact,you can adapt nearly anysmoothie recipeto a bowl by using about ⅓ less liquid and/or adding in a thickener like silken tofu,avocado,nut butter,extra frozen fruit (bananas will make it extra creamy),yogurt,or even cooked cannellini beans.
Make sure to use as much frozen fruit in a smoothie bowl as you need to keep it thick;you don’t want your breakfast to be soupy,and you don’t want your delicious toppings to sink,either!
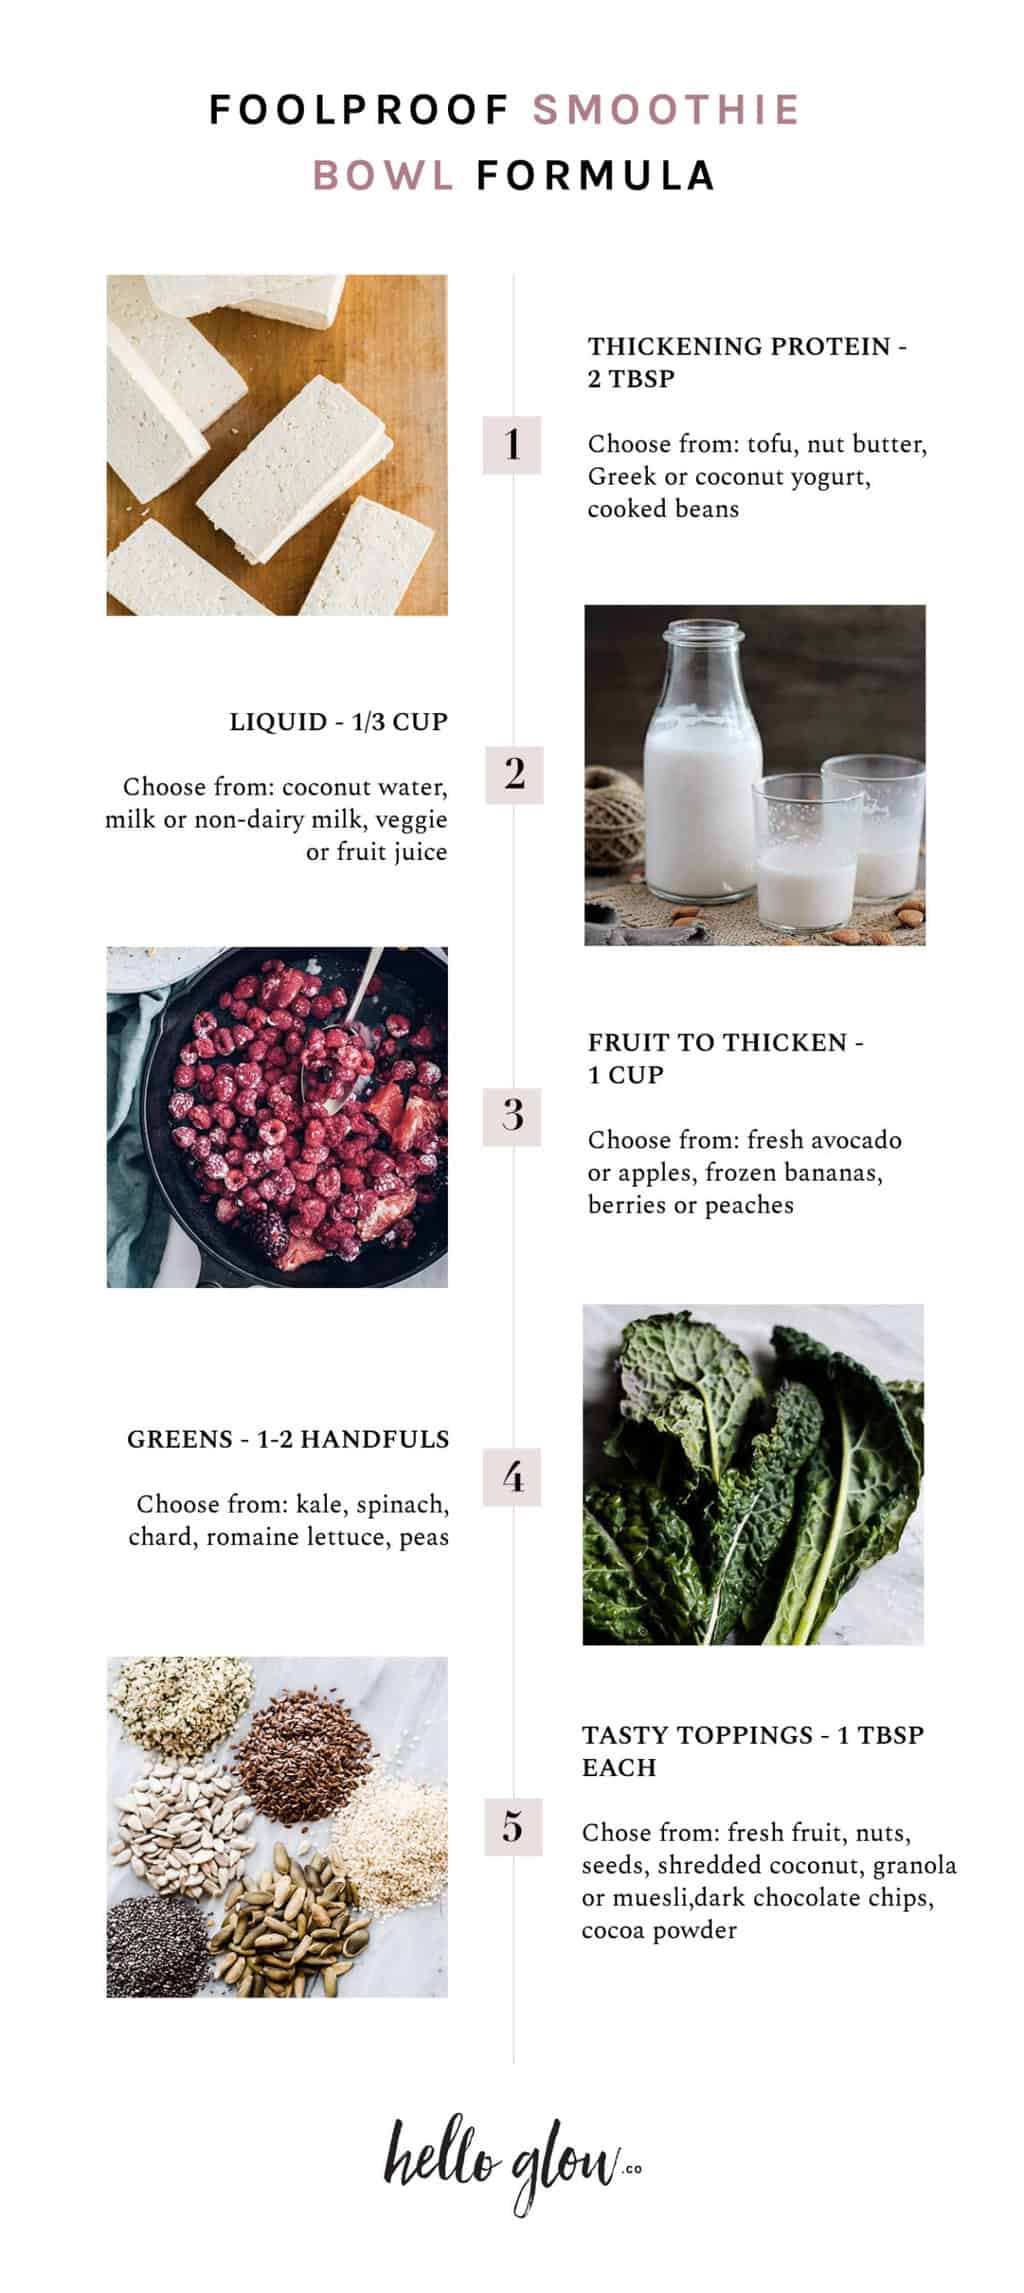
5 Steps to the Perfect Smoothie Bowl Recipe
Adjust these amounts to your desired flavor and thickness. Simply add everything into the blender,mix up and pour into a bowl before topping.
1. Pick a thickening protein (about 2 tablespoons)
Choose from:tofu,nut butter,Greek or coconut yogurt,cooked beans,flax or hemp seeds,oats
Note:chia seeds absorb liquid,so they will also help thicken your smoothie
2. Add a liquid (about ⅓ cup)
Choose from:water,coconut water,milk or non-dairy milk,veggie or fruit juice
3. Add fruit to thicken and sweeten (about 1 cup)
Choose from:fresh avocado or apples,dates,frozen bananas,berries or peaches,oranges
This article was medically reviewed by Dr. Gina Jansheski,a licensed,board-certified physician who has been practicing for more than 20 years. Learn more about Hello Glow’s medical reviewers here. As always,this is not personal medical advice and we recommend that you talk with your doctor.